This started with a very small problem.
I was updating my portfolio and needed clean screenshots of emails I had built.
Not just one screenshot, either. I wanted to show the states I actually design and develop for:
I already had the email. I already had the different views.
What I didn't have was a convenient way to turn all of them into clean image files I could drop into my portfolio, a case study, documentation or a presentation.
Of course, I could take screenshots manually.
Open the email. Resize the browser. Screenshot. Crop. Rename. Repeat.
Four times.
For every email.
No, thank you.
So I built a little screenshot tool instead. 🙃
What I wanted
The requirement was actually pretty simple.
Give the tool an email and automatically generate four consistent screenshots:
desktop-light.png
desktop-dark.png
mobile-light.png
mobile-dark.png
No browser chrome. No manually resizing windows. No cropping.
And because these are going into my portfolio, consistency matters. I don't want one mobile screenshot to be 375px wide and another to be 402px because that's approximately where I dragged my browser window that day.
I wanted repeatable output.
How it works
The tool runs locally on my computer.
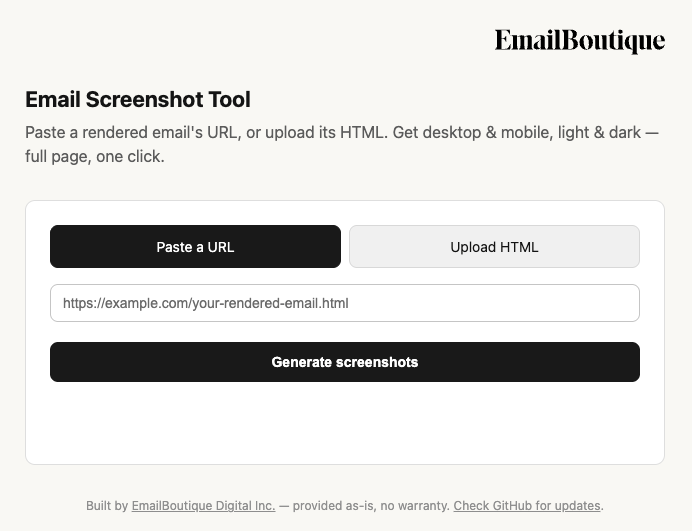
I start it, open a small interface in my browser, give it the email I want to capture and generate the screenshots.
Behind the scenes, it uses browser automation to open the email at predefined viewport sizes, render the different colour schemes and capture the result.
That's really it.
A very small tool solving a very specific problem.
And those are increasingly becoming my favourite things to build.
Want to build your own?
The setup is surprisingly small.
You'll need Node.js installed on your computer and a little familiarity with Terminal, but you don't need to build an entire application.
Create a folder and initialize a Node project:
mkdir email-screenshot-tool
cd email-screenshot-tool
npm init -y
I used browser automation so the tool can open the email, control the viewport and capture the result automatically.
Puppeteer is one way to do that:
npm install puppeteer
That's it — no separate install step. Puppeteer downloads its own bundled Chromium as part of npm install, so your script has a browser it can control right away.
Decide what desktop and mobile mean for your screenshots.
For example:
const views = {
 desktop: {
  width: 700,
  height: 900
  },
 mobile: {
  width: 390,
  height: 844
 }
};
The exact dimensions aren't really the point.
Consistency is.
Once you've decided what your portfolio's desktop and mobile screenshots should look like, every email can be captured the same way.
The basic screenshot function can be surprisingly small:
const puppeteer = require('puppeteer');

async function capture(browser, url, width, height, filename) {
  const page = await browser.newPage();
  await page.setViewport({ width, height });

  await page.goto(url);

  await page.screenshot({
    path: filename,
    fullPage: true
  });
  await page.close();
}
Open a page. Set the viewport. Take the screenshot. Save it.
I launch the browser once and reuse it for every screenshot — opening and closing a fresh page each time is much cheaper than starting a new browser from scratch four times over.
Once that works for one viewport, you can repeat it programmatically for all the states you need.
Dark mode was non-negotiable for me.
If I'm showing email development work, I want to be able to show how the email behaves in different environments — not just the prettiest light-mode version.
Puppeteer can emulate the preferred colour scheme:
await page.emulateMediaFeatures([
  { name: 'prefers-color-scheme', value: 'dark' }
]);
Or:
await page.emulateMediaFeatures([
  { name: 'prefers-color-scheme', value: 'light' }
]);
Combine those with the desktop and mobile viewport sizes and you have your four screenshots.
Technically, I could have stopped there.
Run a command, generate screenshots, done.
But I know myself.
If I have to remember commands every time I want to use a tool, eventually I'm not going to use the tool.
So I added a simple interface.
My version runs locally at:
I start the local server with:
npm start
Then I leave that Terminal window running while I use the tool in my browser.
This distinction is important.
I discovered that after staring at:
This site can't be reached
...while wondering what I had broken.
Nothing.
The server simply wasn't running. 😂
The first version generated the screenshots and let me download them individually.
Technically complete.
Except now I had four Download buttons.
And after building an entire tool because I didn't want to perform repetitive manual steps, clicking four buttons suddenly seemed completely unreasonable.
So:
Download All.
Much better.
Once I realized this wasn't just a one-off script and was something I'd actually use, I cleaned it up.
I added the EmailBoutique branding, the full logo linking back to emailboutique.io, proper styling and a footer.
I also added documentation, licensing and a disclaimer to the GitHub repository.
Because apparently even the tools running on my localhost need to be on brand.
It's how this came about.
I didn't decide:
I'm going to build an application today.
I was doing my actual work.
I needed something.
It didn't exist in quite the way I wanted it.
And instead of adding another manual process to my workflow, I asked:
Can I just build this?
Increasingly, the answer is yes.
That's one of the things I find most interesting about working with AI as someone who already comes from design and development.
I know the problem.
I know the workflow.
I know what the output needs to look like.
I can see when something doesn't work.
AI dramatically shortens the distance between "I wish I had a tool that did this" and actually having one.
For most of my career, a tiny internal utility had to save enough time to justify the time required to build it.
That calculation is changing.
Small friction can become small software.
And in a specialized field like email development, that's particularly useful. Some of the tools I want are probably too niche for anyone to turn into a commercial product.
They don't need to be.
They just need to solve my problem.
This one did.
I needed four screenshots for my portfolio.
So 45 minutes later I had one, and now I'm sharing it.
Check out the repo: github.com/Annett/email-screenshot-tool
📩 Connect with me on LinkedIn or send a message.
With love from one of the rabbit holes 🐇
Annett
Founder, EmailBoutique.io